SharePoint document templates: A solution to the one-template-per-content-type problem?

One of our customers was upgrading their intranet from SP2010 to 2013, and wanted help improving their document management solution simultaneously. Their current solution already had a lot of document templates, and since we wanted to merge some of the libraries having different templates, we were looking at a situation of having libraries with perhaps 30-50 templates, which in SharePoint means 30-50 content types. Not only would this be a pain to maintain, it also makes it much harder for users to use the templates. And let’s face it, managing document templates in SharePoint is already an awful experience, even with just a few templates to manage. In this case, as in most, the metadata from SharePoint had to be visible in the documents created using the templates as well. That meant having quick parts in the templates with a connection to the fields in the SharePoint library. So, in a conversation with the customer, one of them asked if we couldn’t simply put the templates in Word instead. My immediate reaction was “Hmm… no… i don’t think so. I don’t think the connection to SharePoint will be maintained”. But then I thought about it and figured it just might work. If the template was stored in a SharePoint library, the correct quick parts could perhaps be added and work anyway. So I did some searching and came up with the following solution:

  1. Put the documents that should be used as templates in a document library in SharePoint
  2. Set the Workgroup templates property in MS Word to the address of the SharePoint template library

In other words, new documents aren’t created from the SharePoint library at all. Instead the user can create new documents directly from word, which is an improvement in my opinion (though I would prefer if you could still create documents from SP as well). The Workgroup templates property in Word allows users to point to a folder, making all the documents in that folder appear as custom templates in Word. The problem was that you’re not allowed to set the Workgroup templates property to a web address. I did some searching, and found a few posts on how to work around this. What you need to do is:

  1. Map a network drive to the address of the SharePoint library
  2. Set the Workgroup templates property in MS Word to another network drive (not the one you just created)
  3. Open regedit and modify the property to point to your own network drive

After performing these steps, the files stored in the SharePoint library can be used as templates in word, with working quick parts, and you won’t even need to open SharePoint to create documents anymore. Note: This works in both SharePoint on-premises, and SharePoint Online!

Ok, so how do we do this?

1. Map a network drive to a SharePoint library

There are plenty of examples out there on how to do this. Here is the MS one: https://support.microsoft.com/en-us/kb/2616712?wa=wsignin1.0

  • Make sure the site with the document library is added to your list of Trusted Sites.
  • If using SharePoint Online, log into your tenancy, and make sure to remember the credentials.
  • Right-click Computer and choose “Map network drive…” in the menu.
  • In the Map Network Drive dialog, enter the following. Drive: Choose a Drive to map it to. I like S: as in SharePoint. =) Folder: Paste the URL to the document library
  • Click Finish

Windows explorer should now be opened automatically, showing you the contents of the library. MappedDrive

2. Set the Workgroup templates property in MS Word

The next thing we need to do is set the Workgroup templates property in MS Word. This will make the given location be used as a folder for custom document templates. I am using Word 2013 in this example. But it should work for 2007 and 2010 as well, even if the paths may vary.

  • Open MS Word
  • Go to File –> Options –> Advanced (scroll to the bottom) and click the “File Locations…” button.
  • Modify the Workgroup templates property and set it to a non-web address location. I set it to D: for example (see image) WordWorkgroupTemplates
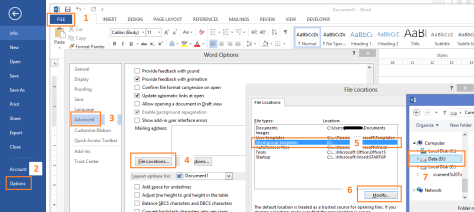
  • Confirm all the dialogs and close Word.

3. Open regedit and modify the property

  • Open up the registry editor (press the windows key, type “regedit”, press enter)
  • Go to HKEY_CURRENT_USER/Software/Microsoft/Office/15.0/Common/General Note: Replace “15.0” with your current office version.
  • Modify the “SharedTemplates” property and set it to the drive of your SharePoint library, in my case S: regedit
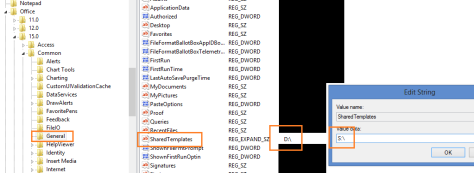
  • Confirm the dialog and close the registry editor.

4. Create a new document using your new template

And now you are done, ready to use the documents stored in the library as templates!

  • Open Word and go to the New screen
  • Click the Custom tab, and you will see a folder named “S:” (or whichever drive you mapped the library to) newDocument
  • Open the S: folder to see all the documents stored in the library. Just click the one you want to use as a template. newDocument2
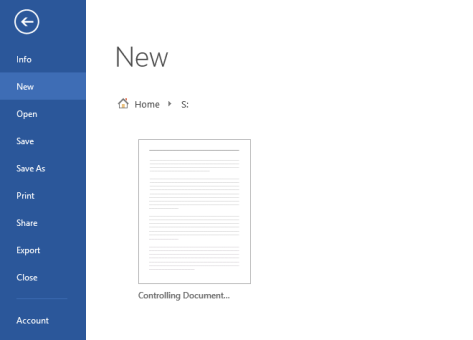
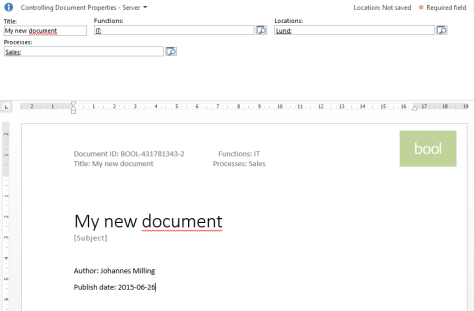
  • Word will now copy the document from SharePoint and create a new file for you, with SharePoint field references working perfectly. newDocument3

Benefits over regular SharePoint document templates

Easier to update templates. To edit the templates, you just need to edit the documents stored in the template library, rather than edit the template file connected to a content type, saving you a lot time, especially when adding/changing quick parts in the template. Create documents from Word, instead of SharePoint. Word is the program you use to edit documents, so why should I have to go to SharePoint to create a new one? Wouldn’t it be easier if I could create a new document from a template directly in Word? Yes it would. It would simplify the process greatly. Separation between Content Types and Template. Having a 1-to-1 relationship between Content Types and Templates is a system design mistake of epic proportions, and one of the reasons you cannot create a great document management system in SharePoint without customizations. Separating the two is a major win, enabling you to have a great number of templates without adding unnecessary complexity.

Limitations and drawbacks

Single Site Collection. This solution will ONLY WORK ON A SINGLE SITE COLLECTION! The templates will need to be stored on a library on the same site collection were the new documents will be saved. It can be on different web sites, but save it on another site collection and the fields won’t update inside the document, even if the content type is distributed through a content type hub. This means that the users need to know where to save the documents if they should work as expected. This basically means that you cannot have a document management system (DMS) consisting of several site collections, which you shouldn’t want to anyways. But this puts a limit to scalability. You can use archiving to keep your DMS site collection below the recommended levels, but it’s still more limited. There may be a way around this by ensuring that the fields SourceID and internalName attributes are consistant between site collections, but I haven’t tested it yet.   I hope you give this a try. It’s a working (although not great) way of separating Content Types and Templates, which is something MS should have done a looong time ago.

Discovering Web Workers

So I wanted to learn about Web Workers, since they are (as far as I have come to understand) the only real way of running javascript in a separate thread. The following post is my explanation of the concept as I have percieved it at the time of learning.

Note: I wrote this post in the process of learning, meaning I’m not an expert. Don’t take my word as the truth. They’re just my interpretation of what others have said, and my own tests.

Web Workers

Web Workers allows running scripts “in the background”, in a separate thread from that of the user interface, allowing tasks to be performed without disturbing the user experience. Since javascript is a single threaded language, only able to simulate multithreading by using for example yield() or setInterval(), workers might be the only option for running javascript in separate threads. At least as far as I know.

Some things to know about web workers

  • Workers have a high start-up performance cost
  • Each worker instance consume a high amount of memory
  • Workers are not intened to be used in large numbers at the same time

A worker should not be something you call frequently to perform small tasks, since the cost of calling the worker will exceed the benefit of running it in a separate thread.

So when do you use Web Workers then? Well, if you want to run something that has a high performance cost, without interfering with the user experience, web workers can be a viable option. Uses can include for example perform heavy calculations, or having a “listener” for notifications running in the background.

So how do you do it?

Simple example

First of all, I have a simple html page, with a span to post my results, and buttons to start and stop my worker.

<html lang="en">
 <head>
[...]
 </head>

 <body>
 <input type="button" onclick="startWorking();" value="Start working!">
 <input type="button" onclick="stopWorking();" value="Stop working!">


 Results: <span id="resultSpan">...</span>

 <!-- load scripts at the bottom of your page -->
 <script src="javascript/foreman.js"></script>
 </body>
</html>

Next, I have a javascript file being loaded to the page. This is not my worker, but the script responsible for calling the worker. I call it foreman.js.

The first thing I want to do is to get my resultSpan element to present the results of the workers. I also create a variable for storing my worker object.

var result = document.getElementById("resultSpan");
var worker;

Next I create a function for stopping the worker.

function stopWorking() {
 worker.terminate(); // Tell the worker to stop working.
 worker = undefined; // Fire the worker.
}

Not all browsers support workers, so a function to check for worker support might be a good idea.

function browserSupportsWebWorkers() {
 if(typeof(Worker) !== "undefined") {
 // Yes! Web worker support!
 return true;
 } else {
 // Sorry! No Web Worker support..
 return false;
 }
}

And now to the important parts. We want to be able to call our worker, and create a function for doing just that.

function startWorking() {
// Code goes here.
}

The first thing I do is checking if the browser supports workers. If it doesn’t, I can handle it in different ways. This is good if you don’t want your functionality to break due to compatibility issues.

 if (!browserSupportsWebWorkers()) {
 // What to do if browser doesn't support workers.
 return;
 }

Then I instantiate a new worker object, referencing the worker javascript file. And yes, the worker code needs to be located in a separate file.

 worker = new Worker("javascript/worker.js"); // Create a new worker object.

// Code goes here.
}

Now when we have the worker object, we need to define what will happen when we get a response from it.  Communication between the foreman and worker will be passed through messages, and we need to declare what to do with those messages. The code below shows 2 ways of doing the same thing.

 worker.onmessage = function(event) { // Tell the foreman what to do when the worker response comes.
   result.innerHTML = event.data;
 };

 // This is another way of doing the same thing.
 worker.addEventListener("message", function (event) {
   results.innerHTML = event.data;
 }, false);

In the code above, we declare that when we recieve a message from the worker, we will get that message and show it in our resultSpan by setting its innerHTML.

We may also want to handle what happens if an error occurs. In addition to the .onmessage event, we can declare the .onerror event for just this reason.

worker.onerror = function(event) { // Tell the foreman what to do when the worker fails.
   result.innerHTML = "Error: " + event.message;
 };

The last thing is to call the worker. This is done by calling the postMessage function of the worker object.

worker.postMessage(); // Tell the worker to start working.

What will happen now is that the worker javascript will be loaded and executed. The results will depend on what we put in the worker.js file. All we have done in foreman.js is to say that we will present the results of the worker. So let’s take a look at the actual worker: worker.js.

var i = 0;

function timedCount() {
 console.log("Worker says: Counting to " + i);
 i = i + 1;
 postMessage(i);
 setTimeout("timedCount()",500);
}

timedCount();

In this simple example, all I want to do is to illustrate a continuous process being run in the background. The worker runs a recursive function every 500 milliseconds and sends the response back to the foreman. The message is being passed by calling the postMessage function. The object put as a parameter in postMessage will be available in event.data in the foreman script. In this case it’s an integer, but it could just as well be a string or JSON object.

Calling specific worker functions

You cannot call a specific function within a worker directly. When the worker is called, it simply runs the file. However, you can implement your own handling by passing function names as parameters.

In my next example, I have another worker file, skilledWorker.js. It contains three functions. I choose to store these in an object called actions, and you will see why later. This is not required however, and there are many ways of implementing support for calling certain functions.


var actions = {};
actions.count = function (parameters) {
  // Unpack parameters.
  var number = parameters;

  setTimeout(function () { // Call setTimeout to run function each 1000 ms.
    postMessage(number); // Message the foreman of the current number.
    number++; // Increment number.
    actions.count(number); // Recursively call the same function to increment number with each call.
  },100);
}

actions.calculate = function (parameters) {
  // Unpack parameters.
  var a = parameters.a;
  var b = parameters.b;

  var results = a + b;
  postMessage(results);
}

actions.read = function (parameters) {
  // Unpack parameters.
  var results = parameters.text;
  postMessage(results);
}

Next, I need to declare what will happen when my worker receives a message.


self.onmessage = function (event) {
  handleMessage(event);
}

This says that I should call the function handleMessage and pass my event whenever a message is received. All that’s left is implementing the handleMessage function.

function handleMessage(event) {
    var command = event.data.command;
    var parameters = event.data.parameters;
    var action = actions[command];
   
    if (action) {
        action(parameters);
    }
    else {
        postMessage("Unknown command");
    }
}

What happens here is that we retrieve the event.data, and get two properties from it, command and parameters. These has to be passed when calling the worker, and I will show how in a bit.

The next piece of code I got a little help from my friend and colleague Anatoly Mironov who has one of the best SharePoint blogs out there.

Since we store our functions in the object called actions, calling “actions[command]” will return the function matching the command string. If no functions matches, the value will simply be undefined. The simple if-statement allows you to check and handle what happens when trying to call a function that doesn’t exist.

The last thing we need to do is to call the worker passing the correct command and parameters.

Passing parameters

Calling a worker with parameters is still done with postMessage(). You can pass either a string or a JSON object. This example will demonstrate how to pass a JSON object. Passed parameters will be available in the worker in event.data. As you saw above, our workers handleMessage function needed the data to contain .command and .parameters. So when calling postMessage() we simply input a JSON object containing these two values.


worker.postMessage( { 'command': 'count', 'parameters': 1 } ); // Tell the worker to start counting.

worker.postMessage( { 'command': 'calculate', 'parameters': {'a': 5, 'b': 10 } } ); // Tell the worker to calculate.

worker.postMessage( { 'command': 'read', 'parameters': {'text': 'This is text the worker is supposed to read.'} } ); // Tell the worker to read the text.

In the code above, each  line will call the worker, but running different functions, which in turn use different parameters.

In conclusion

Web workers are not very difficult to work with once you understand how they work, and while their use might be limited due to the heavy initial performance cost, being able to running a background thread for large tasks can be quite powerful.

If you want to check the full code I have a GitHub repository for it here: https://github.com/Johesmil/webworkers.

If you want to learn more about Web Workers from people who actually know what they’re talking about, check out the links below. =)

Sources

Web Workers

http://www.htmlgoodies.com/html5/tutorials/introducing-html-5-web-workers-bringing-multi-threading-to-javascript.html
http://www.w3schools.com/html/html5_webworkers.asp
https://developer.mozilla.org/en-US/docs/Web/Guide/Performance/Using_web_workers
http://anders.janmyr.com/2013/02/web-workers.html
http://www.html5rocks.com/en/tutorials/workers/basics/

SharePoint two way lookup field, strictly out of the box

Sometimes you forget that SharePoint can do things out of the box, and you immediately start to think about how to customize or buy third party products to solve issues.

I for example, wanted a two way lookup between two lists. In other words, if I added items from List A to a lookup of an item in List B, I would like to be able to see the relationship on items in both lists. When I got the advice to buy a third party product for this, I thought I’d just see if there were any other options, and of course there was!

By following the steps on this blog, all I needed to do was to edit the display form of List B, and insert the related list. To do this, just go to list settings -> Forms Web Parts -> Default Display Form.

formWebParts

You will be redirected to the display form in edit mode. Just click the web part zone and the insert tab will appear. Open it, click Related List and select the list in the drop down.

relatedList

This will add a list view web part to the form, which is pre-connected to the item opened in the display form. Next time you open up an item in the list, you will see the list view of the related items in the form. Of course you can do this on the new, and edit forms as well.

This approach doesn’t look very good however, and you won’t get the related items in a list view. But it’s cheap, and could suit customers who are very cost-aware (a nice way of saying cheap). And with a little JSLink magic you should be able to make it look a lot better with hardly any effort at all.

Generate Guid easily with ReSharper

Sometimes the smallest things make our life a lot easier.

Like this tiny – but great – feature from ReSharper for generating Guids. Simply write nguid in any file, no matter the type, and press tab.

guid1

ReSharper will then generate a new Guid for you, and even let you choose a format.

guid2

Just one of those small, nice things making ReSharper a delight to work with. =)

(Thanks for the tip Villy)

Embedding a PDF file dynamically on a web page

So embedding a PDF to a web page is pretty easy. All you need to do is to add an object or embed element to your HTML.

Actually, you could use only object or embed, depending on browser support. But using both is a safeguard. If object fails to load it’s data, it will render it’s child elements instead, in this case the embed element.

< object data='myPDF.pdf' type='application/pdf'>
 < embed src='myPDF.pdf' type='application/pdf'></embed>
</object>
 

There are spaces between the < and object/embed elements since WordPress doesn’t allow these elements. Remove it if copying this code.

But what if you don’t know what PDF file you want to display, and you want to load it dynamically? This is what I was trying to do, and of course I ran into problems displaying the PDF in Internet Explorer. This is how you should be able to set which file will be loaded using javascript. First, we add the elements to our HTML. To make it easier to get the elements in our javascript, give them a unique id.

< object id='myPdfObject' type='application/pdf'>
 < embed id='myPdfEmbed' type='application/pdf'></embed>
</object>

Then, in javascript, we SHOULD be able to change witch PDF should be shown like this.

// Get the elements.
var pdfViewerObject = document.getElementById("myPdfObject");
var pdfViewerEmbed = document.getElementById("myPdfEmbed");

// Set the elements to reference our PDF file.
pdfViewerObject.setAttribute("data", pdfUrl);
pdfViewerEmbed.setAttribute("src", pdfUrl);

It works perfectly in Chrome, but in IE (tried versions 10 and 11 as well as emulated 8 and 9), you will only see a grey frame with nothing in it. When debugging the javascript the attribute is actually updated, and everything seems to be fine, except you can’t see the PDF. Very frustrating. After a bit of googling i found a solution here (it’s not the marked answer). Instead of using <element>.setAttribute(), which should work, you need to modify the outerHTML attribute of the element.

pdfViewerObject.outerHTML = pdfViewerObject.outerHTML.replace(/data="(.+?)"/, 'data="' + pdfUrl + '"');
pdfViewerEmbed.outerHTML = pdfViewerEmbed.outerHTML.replace(/src="(.+?)"/, 'src="' + pdfUrl + '"');

However, this will only work if you already have the attribute present. So either you need to have a default url in your HTML, or you need to set the attribute first, which both is kind of annoying. Putting it all together it might look something like this.

var pdfUrl = "http://mySite/myPDF.pdf";

var pdfViewerObject = document.getElementById("myPdfObject");
pdfViewerObject.setAttribute("data", pdfUrl);
pdfViewerObject.outerHTML = pdfViewerObject.outerHTML.replace(/data="(.+?)"/, 'data="' + pdfUrl + '"');

var pdfViewerEmbed = document.getElementById("myPdfEmbed");
pdfViewerEmbed.setAttribute("src", pdfUrl);
pdfViewerEmbed.outerHTML = pdfViewerEmbed.outerHTML.replace(/src="(.+?)"/, 'src="' + pdfUrl + '"');

And there you go. Dynamically loading an embedded PDF to a web page, working in IE 8-11 and Chrome, and hopefully other browsers as well.

My main sources/further reading:
http://stackoverflow.com/questions/676705/changing-data-content-on-an-object-tag-in-html
http://stackoverflow.com/questions/1244788/embed-vs-object

Export SharePoint list data to XML directly from the GUI

The other day I learned of a cool function in SharePoint which can come in handy if you want to export a list to XML. And best of all, no code, script or SharePoint Destroyer… *cough* … Designer needed. What you do is simply to call an OOTB SharePoint service and specify in the query string what it is you want, and in which format:

http://<site url>/_vti_bin/owssvr.dll?Cmd=Display&List=<list guid>&View=<view guid>&Query=*&XMLDATA=TRUE

So what you do is to call the owssvr.dll from the site you want to export from, and in the query string add Cmd=Display. Then you add the List and View you want to export from. If you want all items and fields you simply set Query=*. Mind, you still might have to reference a view, even though it won’t be used when using the query. And in the end, add XMLDATA=TRUE. That’s it! An example of how it might look:

http://myawesomesite/_vti_bin/owssvr.dll?Cmd=Display&List={002A6DE2-7638-4FEF-A7CD-7427D4DECABA}&View={757d5548-eafc-4a5f-8ef4-e0be36d790a3}&Query=*&XMLDATA=TRUE

You can get the guid to the list by simply going to the list settings and copy the guid from the url. Its the guid after “…&List=”. That’s it. =) Some documentation about it and other SharePoint services: http://msdn.microsoft.com/en-us/library/dd588689(v=office.11).aspx

Unhide a hidden SPField using PowerShell

Another task that’s much harder than it should be. Setting the hidden property of a SPField to false.

First you get the field itself. In this example we change the setting of the field in the library, but it could just as well be done on the site level.

$web = Get-SPWeb http://MyWeb
$list = $web.Lists["MyList"]
$field = $list.Fields.GetFieldByInternalName("MyField")

Then, when you have the actual field, you just need a bit of reflection magic.

$type = $field.GetType()
$mi = $type.GetMethod("SetFieldBoolValue",[System.Reflection.BindingFlags]$([System.Reflection.BindingFlags]::NonPublic -bor [System.Reflection.BindingFlags]::Instance))
$mi.Invoke($field, @("CanToggleHidden",$true))
$field.Hidden=$false
$field.Update()

I don’t know why, but simply setting field.Hidden = $false doesn’t work. But the code above does!

Solution comes from here.

SharePoint 2010 Security Breach: Export to Excel Ignores Security Trimming

I’m currently working on a project where there are lists where permissions are broken and set on the list item level. Basically there are different groups of users, and some should see all items, and some should only be able to view a fiew of them. Now, all of these users have contribute, and can use the ‘Export to Excel’ function, which is very important to them. Now here is the issue I found out just a few days ago. Export to Excel ignores security trimming!

So what does this actually mean? Let me illustrate using a fictional example: I have a list called Accounts, where I store important information about clients and the business I have with them. Some accounts are secret, so I break the permission inheritance on them. Let’s say I have three accounts, A, B and C. Account A is secret, and I’m the only one who has permissions to view it. Now, I have a group of colleagues, who also have access to the Accounts list, and can contribute to it. But when they visit the list, they can’t see Account A, since I have removed their permissions from it. Now what happens when one of my colleagues use the Export to Excel function? You would think that the generated Excel file would only contain accounts B and C. But no! The export function ignores the permissions of the user and only checks if the user has permissions to acces the function itself. The result is the user being able to see account A as well, giving it access to information that should be hidden. In my opinion, this has to be regarded as a bug, because if this is by design, it’s poor design indeed.

EDIT: I tested this in SharePoint 2013, and the bug seems to be fixed. Will try and see if there is a hotfix or CU fixing this issue for SP 2010.

EDIT 2: After installing the July 2014 CU for SharePoint Server 2010, I can confirm that the bug is not fixed. It has to have been fixed for SP 2013 only.

EDIT 3: It seems that security might be trimmed after all, only that it uses the current windows credentials rather than the account logged into SharePoint with. Please read Pierres great comment below. I have personally not tested this though.

Programmatically move a SPListItem to another folder in the same list

I had a hard time finding a good source for this, and therefore decided to write a short post about it.

First of all, I want to say that I am against the use of folders unless you absolutely need them. They add unnecessary complexity, and you can have the benefits of folders without many of the drawbacks by using metadata instead, for example with managed metadata fields. However, as there are no OOTB (out of the box) way of handling permissions for a group of items based in their metadata, folders MIGHT be useful for that purpose. There are other solutions though.

Now to the task at hand, moving a SPListItem based on it’s metadata, and then moving it to a subfolder in the same list. In my example, I will be moving the item in an event receiver.

What we need to do is to check the SPFileSystemObjectType of the SPListItem. This value will actually be File, even it it’s not a document library. Regular list items will also return object type File. This is only needed if you don’t want to move folders the same way.

This code assumes you have already got your SPListItem:

if (item.FileSystemObjectType == SPFileSystemObjectType.File)
{
 // Put the rest of code here.
}

Then we need to get the file object of the item. The file object will exist even if the list is not a library, and this code will work for documents and list items alike.

SPFile file = item.Web.GetFile(item.Url);

Then we want to build the new destination path were the item will be moved to. The path should follow the pattern: “<web url>/<list rootfolder url>/<subfolder>/<item Id>._000”

string filePath = string.Format("{0}/{1}_.000", "My Folder", item.ID);

And lastly, we simply call the SPFile.MoveTo method on our file object, and add the destination path.

file.MoveTo(filePath);

And that’s it. Put this in an ItemAdded function in an event receiver for a list and items will automatically be moved to the correct folder. Below is my complete example where I also make sure the folder exist before moving the item.

public override void ItemAdded(SPItemEventProperties properties)
{
 var item = properties.ListItem;
 var folderName = item["My Column"].ToString();
 var folderUrl = SPUtility.ConcatUrls(SPUtility.ConcatUrls(item.Web.Url, item.ParentList.RootFolder.Url), folderName);

 EnsureFolder(item.ParentList, folderName, folderUrl);

 MoveItemToFolder(item, folderUrl);
}

private static void EnsureFolder(SPList list, string folderName, string folderUrl)
{
 if (!list.ParentWeb.GetFolder(folderUrl).Exists)
 {
 SPListItem newFolder = list.Items.Add(list.RootFolder.ServerRelativeUrl, SPFileSystemObjectType.Folder, folderName);
 newFolder.Update();
 }
}

private static void MoveItemToFolder(SPListItem item, string folderUrl)
{
 if (item.FileSystemObjectType == SPFileSystemObjectType.File)
 {
 var filePath = string.Format("{0}/{1}_.000", folderUrl, item.ID);
 var file = item.Web.GetFile(item.Url);
 file.MoveTo(filePath);
 }
}

Sources:

http://zhebrun.blogspot.se/2011/06/sharepoint-how-to-move-listitem-or.html


Programmatically create, setup and use a custom Site Policy

On a current project I got the task to implement a solution for pushing out Site Policies to team sites. The common way of doing this is by using a Content Type Hub, which there are several blogs and guides available explaining how to do. But in this case this was not an option, and I had to be able to do it programmatically.

Finding examples of how to create a custom Site Policy wasn’t very hard, but what I soon discovered was that hardly any of these actually explained how to setup the schema of the policy the way you wanted. They just explained how to create one and maybe even set it to be used on a given site. And the object model itself isn’t complete enough to let you set everything using code. Eventually I found one single blog post by Dragan Panjkov which showed how to set it up, and managed to get it to work.

Site Policies are actually hidden content types, which you can tell by some parts of the creation process.The creation of the policies are actually pretty simple, and can be done with a few lines of code. First of all, you need reference the InformationPolicy namespace, like so:

using Microsoft.Office.RecordsManagement.InformationPolicy;

The second thing we do is getting the ProjectPolicy content type, which is (according to it’s own description) the “Container content type for Project Policy definitions”.
Note: The code assumes you already have an SPSite object called site.

var projectPolicyContentTypeId = new SPContentTypeId("0x010085EC78BE64F9478aAE3ED069093B9963");
var contentTypes = site.RootWeb.ContentTypes;
var parentContentType = contentTypes[projectPolicyContentTypeId];

The content type id in the code above is always the same, and is the id of the content type “Project Policy”.

Then you can create your own content type using Project Policy as the parent.

var policyContentType = new SPContentType(parentContentType, contentTypes, "My Site Policy");
policyContentType = contentTypes.Add(policyContentType);
policyContentType.Group = parentContentType.Group;
policyContentType.Description = "My Description.";
policyContentType.Hidden = true;
policyContentType.Update();

The next step is to setup the content type with the schema you want to use. For this there is no object model support. You have to write your own xml, which is a real pain. But the great post by Dragan gave a great solution on how to do this.

Setup a Site Policy the way you want it on a site in the browser. Open the site in SharePoint Manager and go to the Content Types collection. There will be a content type with the same name as the policy you just created. Click the content type and scroll down to the XmlDocuments property. Open that collection and copy the value of the <pp:ProjectPolicy> property.

policyschema

You will get an xml string, which you can copy and reuse to create your new policy schema. Doing so is simple. With the same content type object you have created previously, delete the existing project policy XmlDocument using the name from the xml.

policyContentType.XmlDocuments.Delete("http://schemas.microsoft.com/office/server/projectpolicy");

Then load your copied xml string into a new XmlDocument object, and add that to the XmlDocuments collection of your content type, and updated it.

var policySchema = new XmlDocument();
policySchema.LoadXml("Insert policy schema xml here.");
policyContentType.XmlDocuments.Add(policySchema);
policyContentType.Update();

When this is done, all that’s left is to create a Policy, using your content type.

Policy.CreatePolicy(policyContentType, null);

And that’s it. You’ve created your own Site Policy, with a custom schema, and all through code.

To apply the custom policy, simply get the policy object using the ProjectPolicy class, and run the ApplyProjectPolicy method.

var policy = (from projectPolicy in ProjectPolicy.GetProjectPolicies(web)
	where projectPolicy.Name.Equals("My Site Policy")
	select projectPolicy).Single();
ProjectPolicy.ApplyProjectPolicy(web, policy);

I’ve added a simple PolicyService class on GitHub Gist. Feel free to copy and use it if you want. Some tweaks may be necessary. =)

Resources:

http://blog.dragan-panjkov.com/archive/2013/10/27/configuring-site-policy-in-sharepoint-2013-using-server-code.aspx

Previous home for CHUVASH.eu

CHunky Universe of Vigourous Astonishing SHarepoint :)